(Information below is as far the 4th of December 2022 – we are the first wave of travellers after Japan’s COVID border restriction has eased, & there may be inaccuracies or changes in the future so please double-check the information here with other sources.)
We’ve loved our trip so far: Osaka – Kyoto, Tokyo, Yokohama, but some of the information on-line is a bit outdated so we will try to give you the latest information here.
1. Japan’s changes to COVID Vaccine Rules post November 2022
Vaccine Rules for Children November 2022 onwards
Children 17 and under DO NOT need to be vaccinated if travelling with guardians, nor do they need to do COVID tests if not travelling with vaccinated guardian. The official Japanese embassy website has the information clearly in a table. I checked multiple times with Cathay Pacific (through the whatsapp messaging app AND over the phone) and they were very helpful with this information.
Transit rules for COVID Hong Kong Cathay Pacific
Transferring via transit through Hong Kong airport we were not required to show any COVID paperwork (I believe this is the rule as long as it is less than 24 hours transit and you are not leaving the terminal).
Visit Japan Website
Use the visit japan website to fill in your information before arrival to save filling in paperwork on arrival. From what I’ve read there is no longer the need to use the app as your application is a web-based interface which allows you take photos of your passport and vaccine certificate. You will be given a QR code so that you can be ready at the arrival lounge, and it also allows you to pre-fill in your customs declaration. It has saved us a lot of time.
2. Dealing with Luggage in Japan
Luggage Forwarding Services – Trial and error
Luggage forwarding services are also good in theory but hard to find. Google map was great but I could not simply type in “luggage forwarding service”. We finally found one in Shinjuku station in Tokyo: YOMATO transport – which was very easy to miss!. It was in an information desk/store labelled as Information Desk.
Some reminders:
2.1 The lady at the counter told us (in English!) that we can forward luggage with prices as shown in yen marked per piece and per distance, and you can specify a day for it to arrive.
Anything UP TO 7 days was fine (i.e. no additional charge) – but anything OVER 7 days was an additional 10000 yen per day. We were planning to send our luggage to Haneda airport terminal 3 and thankfully there is a 24 hour reception there. There is a map that was printed out at the information desk and we correlated it with the Haneda official website to see where it should be (and it turned out to be easy to find!)
2.2 At least at the company we were going to use did not require a local Japanese phone number and was able to correspond via an email address.
2.3 I made a mistake by not putting the “departure” detail (time and day of flight) on the documentation as I did not know what information to put nor did the lady at the desk. They then emailed us requesting the information which we responded to promptly – however when I eventually called the number from the email (which was the luggage forwarding service tourist information place we went to) – the lady was very apologetic as they had not replied the email – and admitted she had not read the email (!) – thankfully she had already forwarded the luggage so it was just a matter of confirming the date and time of the flight. But it was stressful!
2.4 The luggage was found easily enough when we went to the counter at the Terminal 3 counter at Haneda Airport though at first we went to the wrong end of the departure area and ended up going to “ABC” which is a different company.
Luggage Lockers cannot be counted on!
Luggage lockers are good in theory but everywhere we went (both big and small train stations), we struggled to find any large ones available so – don’t count not them to be available in your planning. You can tell if the locker is taken up as it has a red light on it.
3. Tips for Buying Shinkansen Tickets – You can buy in person – it was cheaper.
Buying Shinkansen tickets is sort of easy sort of and sort of not.
Some tips on catching the bullet train:
3.1 Finding the counter is tricky and buying online is definitely more expensive (eg. we paid about 56600 yen for 5 of us i.e 3 adults 2 children) and if bought online it would have cost maybe 75000 yen. (One website wanted to charge roughly 95000 yen!).
3.2 The information wasn’t that consistent: the online services said that children were defined as 11 and below whereas the man at the JR ticket counter said my 12 year old was a child.
3.3 If you buy at the ticket machine you have to pay in CASH.
3.4 I personally think it’s easy enough to buy here in Japan – but you need to find the right counter at at a big station rather than smaller ones.
3.5 By the way, if you miss your reserved train, from what I’ve read on the internet you can just catch the next unreserved ticket. But please also allow enough time to figure out which platform to go to – because the train stations are massive here in Japan and trying to find the right.
3.6 The Shinkansen is also not necessarily straightforward enough even after you’ve entered through the gate! We had to ask the train conductor as it was not clear on the ticket which platform to go to.
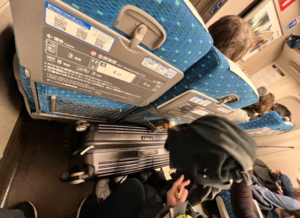
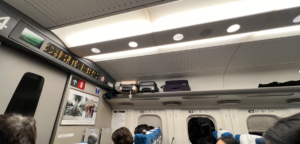
3.7 There is enough luggage space for Shinkansen ride but if you have oversized luggage then try get the front row.

Yes – you can fit a large suitcase in front of your legs, but it’s not super comfortable…

Yes – you can fit cabin-sized luggage above you. But preferably not medium to large.
4. Google translate (because most people do NOT speak English) – benefits and limitations of the app in Japan
Despite what some people say on the internet, most people in Japan still do not speak English. Using google translate was amazing but still limited. Using the conversation function is almost impossible on the street but typing in English to convert to Japanese was great and most people were happy to read the Japanese, but would still reply in Japanese! So we had to communicate via body language a lot!
Google translate Camera function was a live-saver as many places (eg. the restaurants) had writing in Japanese and no English menus were available so we were completely lost sometimes without the translations. We had the kindness of a few random strangers who helped us order our food at times!
5. Google Maps was a life-saver but…
Google MAPS was AMAZING – but watch out for these limitations:
On the Caption:
Note when it says “remain on board” – just make sure it’s the right train”.
“Enter via Takanawa Exit (west exit)” – there should be signs before you get into the station.
Note that there are two different Shinagawa Stations from different companies! Hence you have to walk from one to the other.
CONS:
5.1 In Train stations and indoors the directions get really confusing – so do not rely on the directions in these locations – just ask one of the train conductors/staff about your next stop which you can show on your google map app.
5.2 The public transport instructions are very specific – including which platform, which line etc. but it can be very confusing as the bigger train stations like Shinjuku are simply MASSIVE. So you may still have to ask for directions as the signage can be very confusing. Mostly follow the colours (eg. BLUE, PURPLE) etc. But transfers can be very confusing – so if in doubt – go to the side of the exits and ask staff.
5.3. The train you catch may NOT be the one that google map told you about – eg. it may have suggested an EXPRESS train – and unless you caught the exact time for that train on that platform – it may NOT be the same train even if it’s going the same direction. It’s not a huge deal as at least you are heading in the same direction! Just pay attention to which station you are up to in case you miss the station you were aiming for. Not all trains have English signage for which station you are up to so ask someone if you’re not sure.
5.4 There are often two or more train stations with the SAME NAME. Google map will mention the name of the station but you have to pay attention to which company it is. The issue is that there are multiple private companies that run in Japan (Eg. JR LINE is just ONE of them).
PROs
5.5 It has a “LIVE view” (just click on it in the app within the description of your journey and tilt vertical and point at street) – this shows you in Augmented reality arrows to show you where to walk.
5.6 It was synced up to my apple watch so I got a buzz every time there was a change in direction
5.7 As above the information is very specific and helped us to get from place to place in a very precise manner. It also estimates the fares very accurately.
6. Train Tickets – Cash vs Cards
The IC/SUICA/PASSMO cards are definitely recommended. They are easy to buy and top up and save a lot of mucking around at ticket machines.
But….Finding a place to purchase a child ticket was NOT EASY for us…
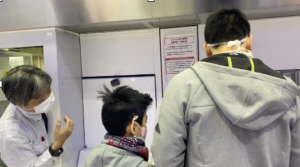
We eventually found a place to purchase the child version – and there was this man behind a counter that was closed off (you spoke through a phone) – it was a very weird experience! He popped his head through the window and asked for the child’s passport and helped us to navigate the machine and our youngest FINALLY got her own card – with her name printed on it! It will be a great keepsake! But it was not easy to source. You can probably get them during office hours at big train stations – but you have to ask the staff and then you may have to walk a long way to find the correct counter! I think this is because the children’s tickets are cheaper there is more of a process to buy these than for regular adult ones. We will definitely hold on to hers as she will still be a child when we come back to Japan!

It was really hard to find a place to buy the kid’s ticket. Here we are at a KEOI machine and that man had to approve the purchase when we showed the passport. He was hidden behind a secret panel!!
Don’t expect to get your deposit back from your IC Card!
It was not convenient to return our cards and get our deposits back. At Haneda airport terminal 3 there were no counters to return the cards for JR cards. Thankfully we had the chance to use up remaining credit on the cards – but we ended up just keeping the cards.
7. Cash is sometimes Still King!
Some stores ONLY take cash STILL! But we found most places now accept credit card. However no-one seems to accept apple pay directly from a mobile phone. They still need the physical card.
International ATM’s in Japan
You can find international ATMS VERY EASILY – 7 Eleven or other convenience stores like Lawsons are probably your best bet. One tip – if you have debit visa/mastercard it’s probably not “SAVINGS” – but try clicking again clicking the option which I think said “NOT SURE” or something like that. I think the correct option is actually “CREDIT”. In Australia for those cards I would have selected “SAVINGS”.
It’s called “TOUCH” – not “payWave” or “PayPass”
If you want to pay by paypass or apple pay you have to tell the staff member “TOUCH” – as they won’t understand any other terms. Also most places do not have apple pay – so don’t expect to swipe your phone everywhere you go like you do in Australia or other countries.
Using a Landline in Japan…!
We used the landline in the tiny hotel we stayed at in Yokohama and it cost about 10 yen per minute (about 10 cents) although the man at the desk initially said it was supposed to be 30 yen per minute. The ability to make phone calls is still needed sometimes – for example when we had to interact with the luggage forwarding service – one phone call beat many emails that were never read!
Hope the above helps! If you have any more questions drop them below!